iGPU Passthrough to VM (Intel Integrated Graphics)
Introduction
Intel Integrated Graphics (iGPU) is a GPU that is integrated into the CPU. The GPU is a part of the CPU and is used to render graphics. Proxmox may be configured to use iGPU passthrough to VM to allow the VM to use the iGPU for hardware acceleration for example using video encoding/decoding and Transcoding for series like Plex and Emby. This guide will show you how to configure Proxmox to use iGPU passthrough to VM.
Your mileage may vary depending on your hardware. The following guide was tested with Intel Gen8 CPU.
There are two ways to use iGPU passthrough to VM. The first way is to use the Full iGPU Passthrough to VM. The second way is to use the iGPU GVT-g technology which allows as to split the iGPU into two parts. We will be covering the Full iGPU Passthrough. If you want to use the split iGPU GVT-g Passthrough you can find the guide here.
Proxmox Configuration for iGPU Full Passthrough
The following examples uses SSH connection to the Proxmox server. The editor is nano but feel free to use any other editor. We will be editing the grub configuration file.
Edit the grub configuration file.
nano /etc/default/grub
Find the line that starts with GRUB_CMDLINE_LINUX_DEFAULT by default they should look like this:
GRUB_CMDLINE_LINUX_DEFAULT="quiet"
We want to allow passthrough and Blacklists known graphics drivers to prevent proxmox from utilizing the iGPU.
Warning
You will loose the ability to use the onboard graphics card to access the Proxmox's console since Proxmox won't be able to use the Intel's gpu
Your GRUB_CMDLINE_LINUX_DEFAULT should look like this:
GRUB_CMDLINE_LINUX_DEFAULT="quiet intel_iommu=on iommu=pt pcie_acs_override=downstream,multifunction initcall_blacklist=sysfb_init video=simplefb:off video=vesafb:off video=efifb:off video=vesa:off disable_vga=1 vfio_iommu_type1.allow_unsafe_interrupts=1 kvm.ignore_msrs=1 modprobe.blacklist=radeon,nouveau,nvidia,nvidiafb,nvidia-gpu,snd_hda_intel,snd_hda_codec_hdmi,i915"
Note
This will blacklist most of the graphics drivers from proxmox. If you have a specific driver you need to use for Proxmox Host you need to remove it from modprobe.blacklist
Save and exit the editor.
Update the grub configuration to apply the changes the next time the system boots.
update-grub
Next we need to add vfio modules to allow PCI passthrough.
Edit the /etc/modules file.
nano /etc/modules
Add the following line to the end of the file:
# Modules required for PCI passthrough
vfio
vfio_iommu_type1
vfio_pci
vfio_virqfd
Update configuration changes made in your /etc filesystem
update-initramfs -u -k all
Save and exit the editor.
Reboot Proxmox to apply the changes
Verify that IOMMU is enabled
dmesg | grep -e DMAR -e IOMMU
There should be a line that looks like DMAR: IOMMU enabled. If there is no output, something is wrong.
[0.000000] Warning: PCIe ACS overrides enabled; This may allow non-IOMMU protected peer-to-peer DMA
[0.067203] DMAR: IOMMU enabled
[2.573920] pci 0000:00:00.2: AMD-Vi: IOMMU performance counters supported
[2.580393] pci 0000:00:00.2: AMD-Vi: Found IOMMU cap 0x40
[2.581776] perf/amd_iommu: Detected AMD IOMMU #0 (2 banks, 4 counters/bank).
Windows Virtual Machine iGPU Passthrough Configuration
For better results its recommend to use this Windows 10/11 Virtual Machine configuration for proxmox.
Find the PCI address of the iGPU.
lspci -nnv | grep VGA
This should result in output similar to this:
00:02.0 VGA compatible controller [0300]: Intel Corporation CometLake-S GT2 [UHD Graphics 630] [8086:3e92] (prog-if 00 [VGA controller])
If you have multiple VGA, look for the one that has the Intel in the name.
Here, the PCI address of the iGPU is 00:02.0.

For best performance the VM should be configured the Machine type to q35.
This will allow the VM to utilize PCI-Express passthrough.
Open the web gui and navigate to the Hardware tab of the VM you want to add a vGPU.
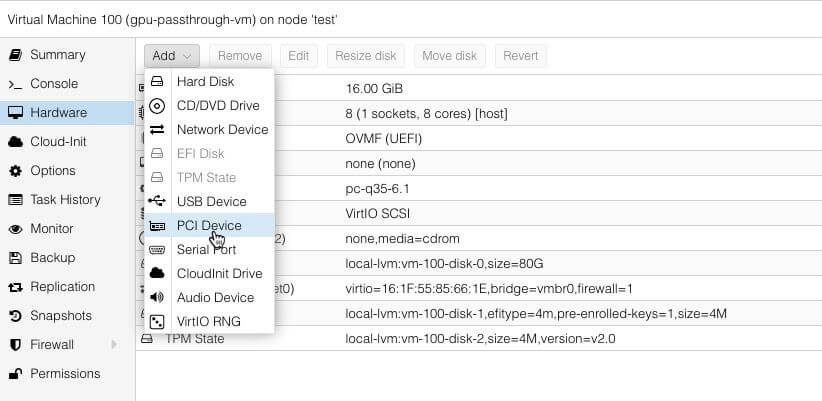
Click Add above the device list and then choose PCI Device
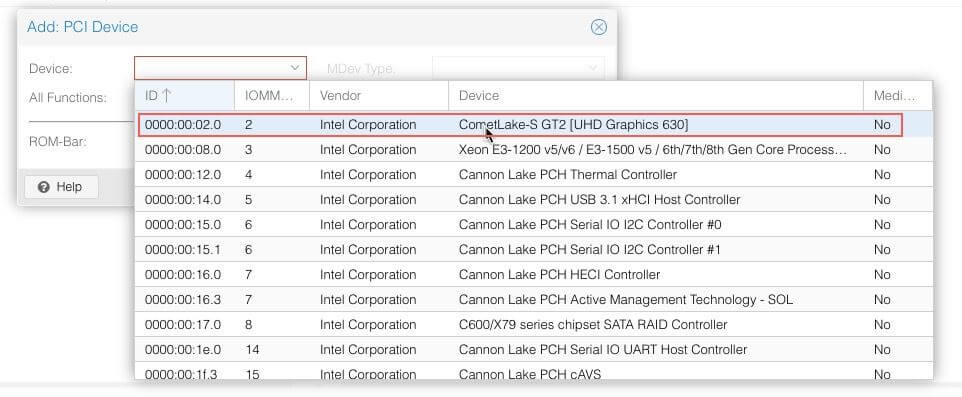
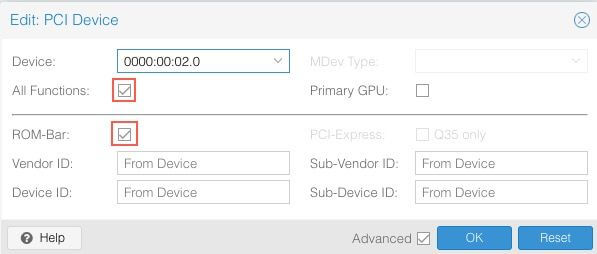
Open the Device dropdown and select the iGPU, which you can find using it’s PCI address. This list uses a different format for the PCI addresses id, 00:02.0 is listed as 0000:00:02.0.
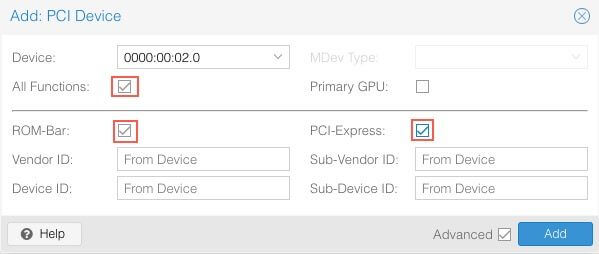
Select All Functions, ROM-Bar, PCI-Express and then click Add.
Tip
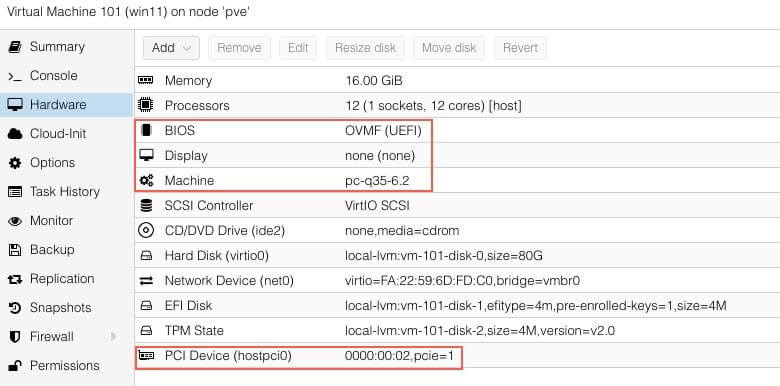
I've found that the most consistent way to utilize the GPU acceleration is to disable Proxmox's Virtual Graphics card of the vm. The drawback of disabling the Virtual Graphics card is that it will not be able to access the vm via proxmox's vnc console. The workaround is to enable Remote Desktop (RDP) on the VM before disabling the Virtual Graphics card and accessing the VM via RDP or use any other remove desktop client. If you loose the ability to access the VM via RDP you can temporarily remove the GPU PCI Device and re-enable the virtual graphics card
The Windows Virtual Machine Proxmox Setting should look like this:
Power on the Windows Virtual Machine.
Connect to the VM via Remote Desktop (RDP) or any other remote access protocol you prefer. Install the latest version of Intel's Graphics Driver or use the Intel Driver & Support Assistant installer.
If all when well you should see the following output in Device Manager and GPU-Z:
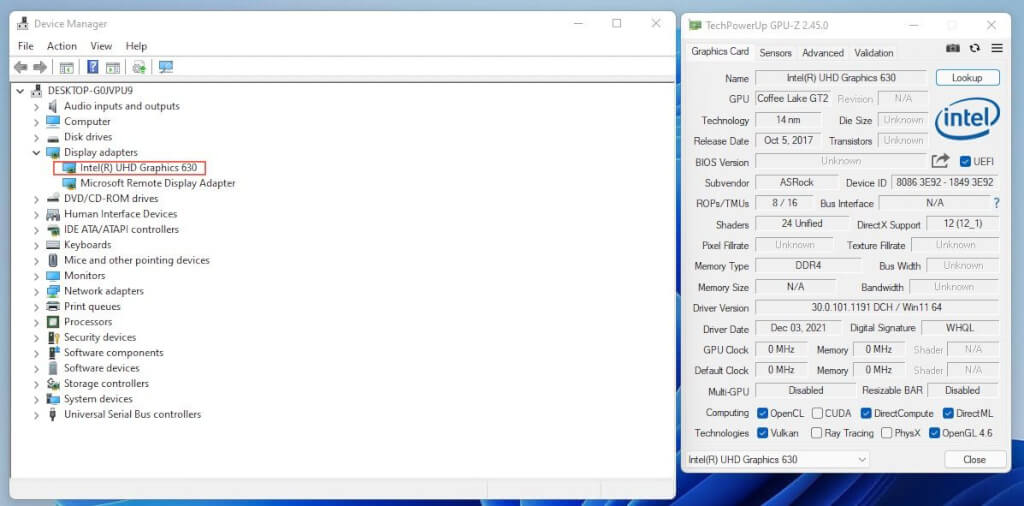
That's it!
Linux Virtual Machine iGPU Passthrough Configuration
We will be using Ubuntu Server 20.04 LTS for this guide.
From Proxmox Terminal find the PCI address of the iGPU.
lspci -nnv | grep VGA
This should result in output similar to this:
00:02.0 VGA compatible controller [0300]: Intel Corporation CometLake-S GT2 [UHD Graphics 630] [8086:3e92] (prog-if 00 [VGA controller])
If you have multiple VGA, look for the one that has the Intel in the name. Here, the PCI address of the iGPU is 00:02.0.

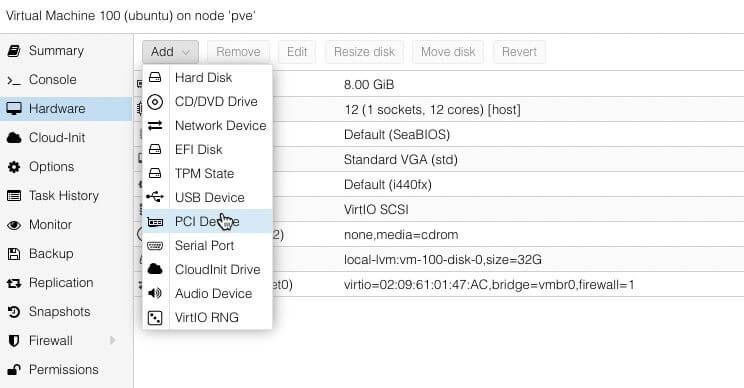
Open the Device dropdown and select the iGPU, which you can find using it’s PCI address. This list uses a different format for the PCI addresses id, 00:02.0 is listed as 0000:00:02.0.

Select All Functions, ROM-Bar and then click Add.
The Ubuntu Virtual Machine Proxmox Setting should look like this:
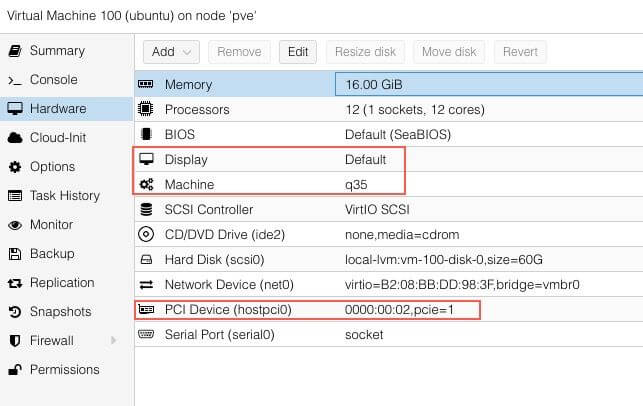
Boot the VM. To test the iGPU passthrough was successful, you can use the following command:
sudo lspci -nnv | grep VGA
The output should include the Intel iGPU:
00:10.0 VGA compatible controller [0300]: Intel Corporation UHD Graphics 630 (Desktop) [8086:3e92] (prog-if 00 [VGA controller])
Now we need to check if the GPU's Driver initalization is working.
cd /dev/dri && ls -la
The output should include the renderD128

That's it! You should now be able to use the iGPU for hardware acceleration inside the VM and still have proxmox's output on the screen.
Debug
Dbug Messages - Shows Hardware initialization and errors
dmesg -w
Display PCI devices information
lspci
Display Driver in use for PCI devices
lspci -k
Display IOMMU Groups the PCI devices are assigned to
#!/bin/bash
shopt -s nullglob
for g in $(find /sys/kernel/iommu_groups/* -maxdepth 0 -type d | sort -V); do
    echo "IOMMU Group ${g##*/}:"
    for d in $g/devices/*; do
        echo -e "\t$(lspci -nns ${d##*/})"
    done;
done;